Install and set default Java JDK version on macOS
Install the latest version of Java JDK
To install the latest version of JDK on macOS follow the steps outlined below:
First, check to see if you already have Java installed on your system. To do so, open the terminal window of your mac by clicking the Launchpad icon in the Dock, then type Terminal in the search field, and click on Terminal. Once you have the terminal open run the following command.
java --versionIf Java is not installed on your system, you will see a message that looks something like this.
The operation couldn’t be completed. Unable to locate a Java Runtime.
Please visit http://www.java.com for information on installing Java.
Otherwise you will see message similar to the message below, in this case we can see that the system has Java 17 installed.
java 17.0.4.1 2022-08-18 LTS
Java(TM) SE Runtime Environment (build 17.0.4.1+1-LTS-2)
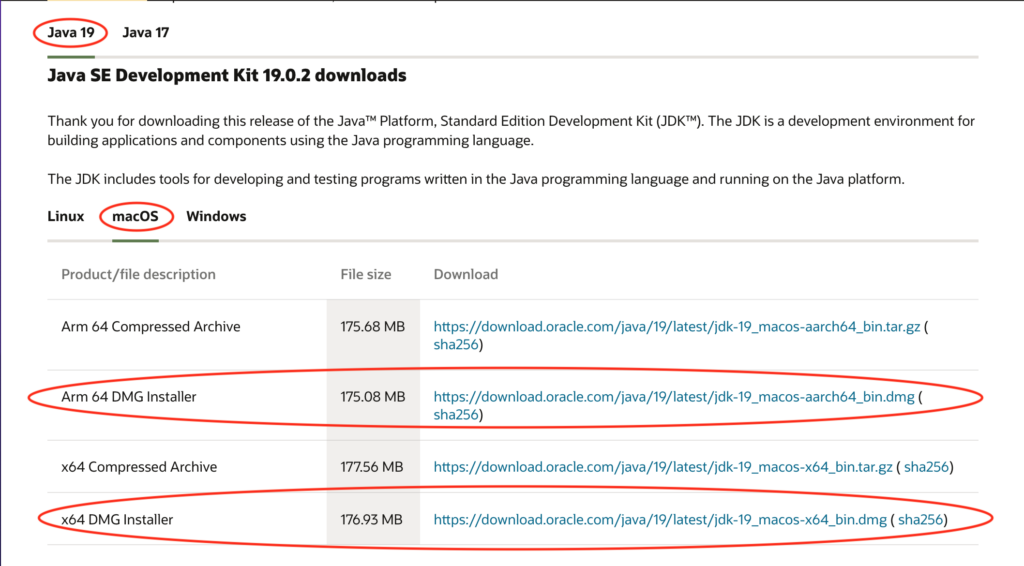
Java HotSpot(TM) 64-Bit Server VM (build 17.0.4.1+1-LTS-2, mixed mode, sharing)To download and install the latest version of Java, in your browser go to Java Downloads Oracle. Select the latest version of Java (currently 19), the operating system (macOS), and the architecture of your Mac. If you are on Intel based Mac select x64 DMG Installer, if you are on Apple Silicon Select Arm 64 DMG Installer.
Once you have the Installer .dmg file downloaded, double-click on it to open then double click on the JDK package to start the installation. In the installation window click Continue and Install. A window will appear and it will ask you for user name and password. Enter the Administrator user name and password and click Install Software. Once the software is installed a confirmation window will display, click on Cancel. You will be prompted to delete the installer, at this point you can go ahead and delete it if you want to save disk space.
Go back to the terminal window and run
java --versionThis time the result should show that you have installed the latest version of Java.
java 19.0.2 2023-01-17
Java(TM) SE Runtime Environment (build 19.0.2+7-44)
Java HotSpot(TM) 64-Bit Server VM (build 19.0.2+7-44, mixed mode, sharing)
Change the default version of Java
First get a list of all the installed Java versions on you Mac by running the following command
/usr/libexec/java_home -VThe result should look similar to this
Matching Java Virtual Machines (2):
    19.0.2 (x86_64) "Oracle Corporation" - "Java SE 19.0.2" /Library/Java/JavaVirtualMachines/jdk-19.jdk/Contents/Home
    17.0.6 (x86_64) "Oracle Corporation" - "Java SE 17.0.6" /Library/Java/JavaVirtualMachines/jdk-17.jdk/Contents/Home
To temporary switch the default Java version to 17 (only for the current terminal session). Run the following command.
export JAVA_HOME='/usr/libexec/java_home -v 17'To make the change permanent run
export JAVA_HOME=$(/usr/libexec/java_home -v 17)Remove/Uninstall Java from Mac
Note: Never uninstall Java by removing the Java tools from /usr/bin
First, open your Terminal window and run the following commands
cd /Library/Java/JavaVirtualMachines
ls -l /Library/Java/JavaVirtualMachines
This will show you the versions of Java currently installed on your Mac.
drwxr-xr-x  3 root  wheel  96 Mar 12 01:56 jdk-17.jdk
drwxr-xr-x  3 root  wheel  96 Mar 12 21:39 jdk-19.jdk
To uninstall Java, all you need to do is remove the directory for the version you want uninstalled by executing the following command.
sudo rm -rf jdk-19.jd