Install WireGuard VPN on Ubuntu Server
Learn how to install and configure WireGuard VPN on remote headless ubuntu server. For this particular example I am using Always Free Oracle Cloud instance, but this instructions should work on any ubuntu server.
Install WireGuard
Start with updating the package sources list with the latest version of packages in the repositories and install WireGuard.
apt update
apt install wireguard
WireGuard installation will create a directory /etc/wireguard. To set the default file creation permission to 600, navigate to /etc/wireguard and change the umask to 077.
cd /etc/wireguard
umask 077
Configure Wireguard Server
Next generate public and private key pair for the WireGuard server.
wg genkey | tee server-privatekey | wg pubkey > server-publickeyGet the content of the two files, by running the following command
tail -n +1 server-privatekey server-publickeyStore the output of the command in a place handy for copy and paste, as you will need to use it later.
==> server-privatekey <==
GK+wX0XxaUY9rlQOHCdF3teRZttWXADMVZ5eLfQa80c=

==> server-publickey <==
vaXI0PRL35MNjlfZSQSrTBVzmJZhGtPv9OmeFZW0hF0=
Next create wg0.conf file. This file will be your WireGurad server configuration file. You can create the file by executing the following command.
nano wg0.confNext paste the following configuration settings in to the wg0.conf file. Make sure to replace the “PrivateKey” value with the private key you generated earlier.
[Interface]
Address = 10.16.0.1/32
ListenPort = 51820
PrivateKey = GK+wX0XxaUY9rlQOHCdF3teRZttWXADMVZ5eLfQa80c=
You can go ahead save the changes and close the wg0.conf file (Ctrl-x press Y press Enter). Then you can go ahead and add the WireGuard service to systemd so it starts automatically on boot. Start the WireGuard service and check its status to make sure it is running.
systemctl enable wg-quick@wg0
systemctl start wg-quick@wg0
systemctl status wg-quick@wg0
If everything is working you should get an output similar to this
● wg-quick@wg0.service - WireGuard via wg-quick(8) for wg0
     Loaded: loaded (/lib/systemd/system/wg-quick@.service; enabled; vendor preset: enabled)
     Active: active (exited) since Mon 2023-03-13 04:02:58 UTC; 13ms ago
       Docs: man:wg-quick(8)
             man:wg(8)
             https://www.wireguard.com/
             https://www.wireguard.com/quickstart/
             https://git.zx2c4.com/wireguard-tools/about/src/man/wg-quick.8
             https://git.zx2c4.com/wireguard-tools/about/src/man/wg.8
    Process: 2662 ExecStart=/usr/bin/wg-quick up wg0 (code=exited, status=0/SUCCESS)
   Main PID: 2662 (code=exited, status=0/SUCCESS)
        CPU: 31ms
Configure Client
Once you have confirmed that WireGuard service is up and running. It is time to set up the first client. Start by creating a directory named after the client, and generating private and public key pair for the client. You can do it by running the following commands.
mkdir /etc/wireguard/mac
cd /etc/wireguard/mac
wg genkey | tee mac-privatekey | wg pubkey > mac-publickey
Same as you did with the server’s key pair get the content of the two files and put it in a place handy for copy and paste, as you will need to use it later.
tail -n +1 mac-privatekey mac-publickeyContent of public and private client keys
==> mac-privatekey <==
cMLgt4BVDe+qtm+50QGVrPULXSYKU120yfSoywlv1nI=

==> mac-publickey <==
S/rtqRg8TSscZfgLluwOcidGH8iKjtZEVjj68QtiCkM=
Create client configuration file wg0-mac.conf
nano wg0-mac.confCopy and paste the following configuration settings in to the wg0-mac.conf file. Make sure to replace the “PrivateKey” value with the client’s private key you generated in the previous step, and the “PublicKey” under [Peer] with the server’s public key you generated earlier, also replace the value of “Endpoint” under [Peer] with your server’s public IP or domain name. Your wg0-mac.conf file should look similar to this
[Interface]
PrivateKey = cMLgt4BVDe+qtm+50QGVrPULXSYKU120yfSoywlv1nI=
Address = 10.16.0.2/24
DNS = 1.1.1.1, 8.8.8.8

[Peer]
PublicKey = vaXI0PRL35MNjlfZSQSrTBVzmJZhGtPv9OmeFZW0hF0=
AllowedIPs = 0.0.0.0/0
Endpoint = 158.101.116.201:51820
You can go ahead save the changes and close the wg0-mac.conf file (Ctrl-x press Y press Enter). The next thing you need to do is, add your client to the server configuration file to allow for connection. To do that open the wg0.conf file.
nano /etc/wireguard/wg0.confAdd the following configuration to the wg0.conf file, make sure to replace “PublicKey” with your client’s public key.
[Peer]
PublicKey = S/rtqRg8TSscZfgLluwOcidGH8iKjtZEVjj68QtiCkM=
AllowedIPs = 10.16.0.2/32
At this point your wg0.conf configuration file should look similar to this
[Interface]
Address = 10.16.0.1/32
ListenPort = 51820
PrivateKey = GK+wX0XxaUY9rlQOHCdF3teRZttWXADMVZ5eLfQa80c=

[Peer]
PublicKey = S/rtqRg8TSscZfgLluwOcidGH8iKjtZEVjj68QtiCkM=
AllowedIPs = 10.16.0.2/32
Next, restart your WireGuard service and take a look at it with “wg” command.
systemctl restart wg-quick@wg0
wg
You should see an output similar to the one below. You can see that your server has wg0 interface that is listening on port 51820, and you are allowing connections to one client with public key and IP that should match the public key and IP of your client.
interface: wg0
  public key: vaXI0PRL35MNjlfZSQSrTBVzmJZhGtPv9OmeFZW0hF0=
  private key: (hidden)
  listening port: 51820

peer: S/rtqRg8TSscZfgLluwOcidGH8iKjtZEVjj68QtiCkM=
  allowed ips: 10.16.0.2/32
Firewall Rules and Configuration
Next, you will have to make sure that your system has iptables installed. You can do it by running the following command
apt install iptables -yIf iptables exists on your system you will get output similar to the one below, if it doesn’t exist the above command will install it for you.
Reading package lists... Done
Building dependency tree... Done
Reading state information... Done
iptables is already the newest version (1.8.7-1ubuntu5).
iptables set to manually installed.
0 upgraded, 0 newly installed, 0 to remove and 45 not upgraded.
After you confirm that you have iptables you will need to collect the name of your public facing network interface. You can do it by running the command below
ip linkAs you can see from the output below I have loopback interface “lo”, and WireGuard interface the “wg0”, which leaves me with “enp0s3” to be my public facing interface. If you have left more than one interface after you rule out “lo” and “wg0” you will need to do some more digging, but if you are like me and only have three, whichever is left is most likely your public facing interface. Take a note of it as you will need it in the next step.
1: lo: <LOOPBACK,UP,LOWER_UP> mtu 65536 qdisc noqueue state UNKNOWN mode DEFAULT group default qlen 1000
    link/loopback 00:00:00:00:00:00 brd 00:00:00:00:00:00
2: enp0s3: <BROADCAST,MULTICAST,UP,LOWER_UP> mtu 9000 qdisc pfifo_fast state UP mode DEFAULT group default qlen 1000
    link/ether 02:00:17:09:39:e8 brd ff:ff:ff:ff:ff:ff
5: wg0: <POINTOPOINT,NOARP,UP,LOWER_UP> mtu 8920 qdisc noqueue state UNKNOWN mode DEFAULT group default qlen 1000
    link/none
Now that you have confirmed that iptables is installed, and you have the name of you public facing interface. Go ahead, open your server configuration file wg0.conf and enter the following configuration in the [Interface] section of the file. Make sure to replace every occurrence of “enp0s3” with the name of your public facing interface (“enp0s3” appears six times in the lines below).
PreUp = sysctl -w net.ipv4.ip_forward=1

PostUp = iptables -I INPUT -p udp --dport 51820 -j ACCEPT; iptables -t nat -I POSTROUTING 1 -s 10.16.0.0/24 -o enp0s3 -j MASQUERADE; iptables -I INPUT 1 -i wg0 -j ACCEPT; iptables -I FORWARD 1 -i enp0s3 -o wg0 -j ACCEPT; iptables -I FORWARD 1 -i wg0 -o enp0s3 -j ACCEPT

PostDown = iptables -D INPUT -p udp --dport 51820 -j ACCEPT; iptables -t nat -D POSTROUTING 1 -s 10.16.0.0/24 -o enp0s3 -j MASQUERADE; iptables -D INPUT 1 -i wg0 -j ACCEPT; iptables -D FORWARD 1 -i enp0s3 -o wg0 -j ACCEPT; iptables -D FORWARD 1 -i wg0 -o enp0s3 -j ACCEPT
This configuration will allow IP forwarding, it will open UDP port 51820, make sure all outgoing packets are translated via the VPN, it will allow all traffic on wg0 interface, and allow packets to forward between the public Interface and the WireGuard every time WireGuard service is started as well as it will reverse everything mentioned above when WireGuard service is stopped.
NOTE: If your server is behind additional firewall or a solution that act as a firewall such as AWS Security Group, OCI Network Security Group, etc. make sure to have port 51820 UDP open there as well.
At this point your wg0.conf file should be complete and it should look similar to this
[Interface]
Address = 10.16.0.1/32
ListenPort = 51820
PrivateKey = GK+wX0XxaUY9rlQOHCdF3teRZttWXADMVZ5eLfQa80c=

PreUp = sysctl -w net.ipv4.ip_forward=1

PostUp = iptables -I INPUT -p udp --dport 51820 -j ACCEPT; iptables -t nat -I POSTROUTING 1 -s 10.16.0.0/24 -o enp0s3 -j MASQUERADE; iptables -I INPUT 1 -i wg0 -j ACCEPT; iptables -I FORWARD 1 -i enp0s3 -o wg0 -j ACCEPT; iptables -I FORWARD 1 -i wg0 -o enp0s3 -j ACCEPT

PostDown = iptables -D INPUT -p udp --dport 51820 -j ACCEPT; iptables -t nat -D POSTROUTING 1 -s 10.16.0.0/24 -o enp0s3 -j MASQUERADE; iptables -D INPUT 1 -i wg0 -j ACCEPT; iptables -D FORWARD 1 -i enp0s3 -o wg0 -j ACCEPT; iptables -D FORWARD 1 -i wg0 -o enp0s3 -j ACCEPT

[Peer]
PublicKey = S/rtqRg8TSscZfgLluwOcidGH8iKjtZEVjj68QtiCkM=
AllowedIPs = 10.16.0.2/32
Next restart WireGuard service to apply all the changes, and if you don’t get any errors you are ready to test your VPN server by connecting to it with your client.
systemctl restart wg-quick@wg0Connect Client to WireGuard VPN Server
To test the connection you can download the client configuration file on your client, and load it in to the WireGuard Client application by clicking on import tunnel from a file and providing the path to the client’s configuration file.

Or click on the + in the bottom right corner of WireGuard Client application and select add and empty tunnel.
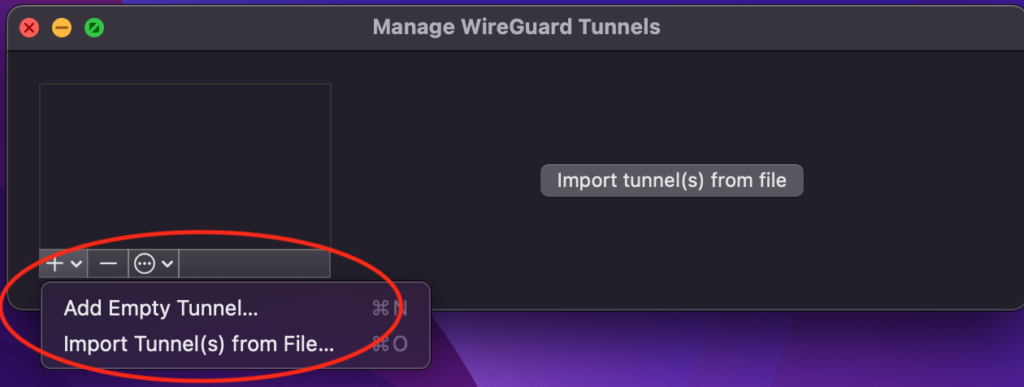
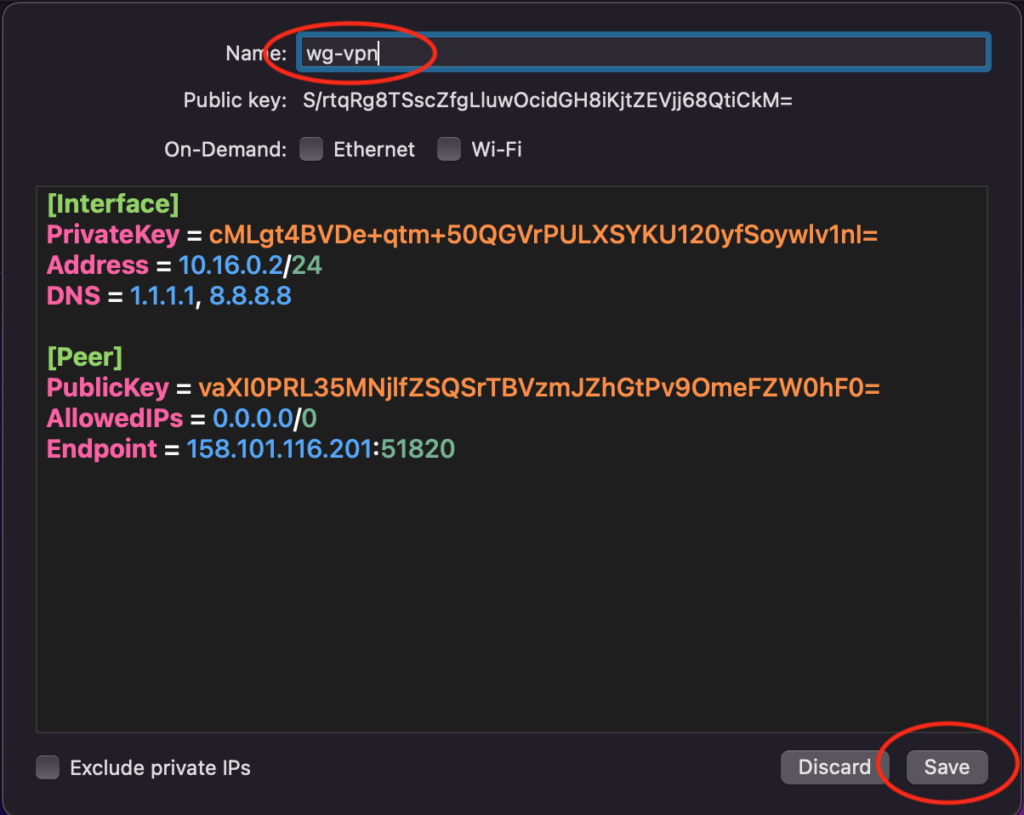
Remove the pre existing “PrivateKey” from Add Empty Tunnel window and paste the content of your client’s configuration file wg0-mac.conf. You can get the content of the file by running the following command
cat /etc/wireguard/mac/wg0-mac.confOnce you paste the client’s configuration in the WireGuard Client App give your tunnel a name go ahead and click “Save”
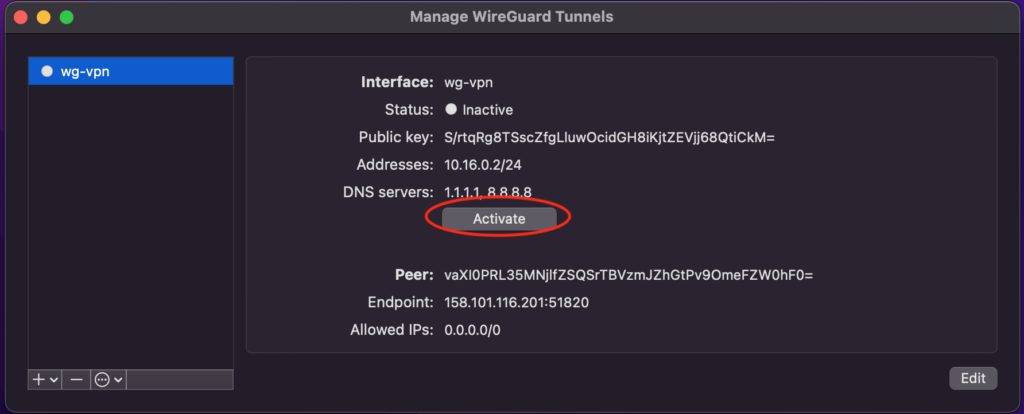
Once you have your tunnel saved you can go ahead and Activate your VPN
At this point the status of your connection should change to “Active”, turn green and you should see the data flowing.
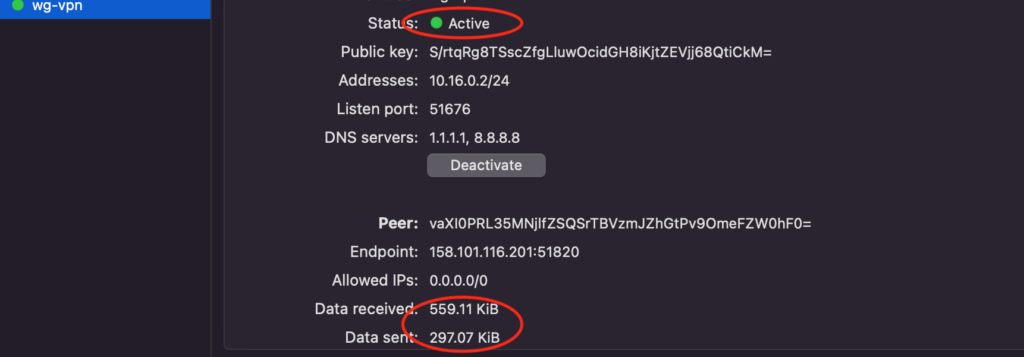
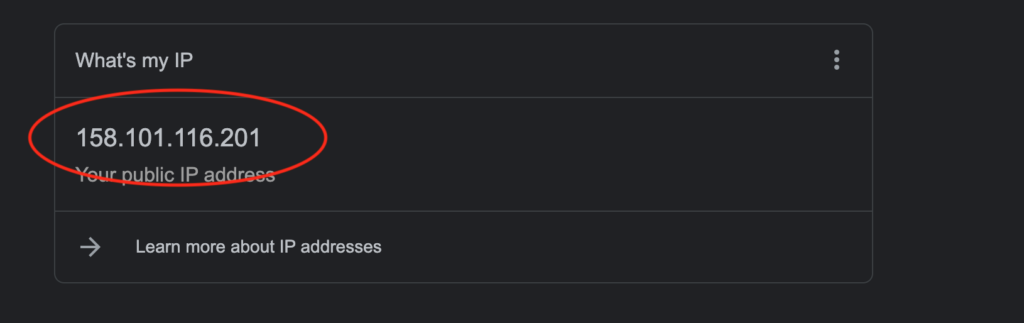
To confirm that your VPN is working as expected, on your client open a web browser of your choice and google search “whats my ip”. The result should show the public IP address of your VPN server.
Configure Additional Clients
To add additional clients repeat every step of the Configure Client section, make sure to assign the new clients an IP address that have not been assigned to another clients.
Client Configuration on Mobile Device
In addition to creating an empty tunnel and pasting all the configuration in it Like we did earlier, or downloading the configuration file, mobile devices have the option to set up a new tunnel by scanning a QR code. To get a tool that will allow you to generate client configuration QR code run the following commands
apt-get install qrencode -yAfter you have “qrencode” installed you can use your client’s configuration file to generate QR code by running the following command.
qrencode -t ansiutf8 -l L < /etc/wireguard/mac/wg0-mac.confThe output of this command should produce QR code that you can scan with your WireGuard mobile app.